Manage your Messages
A message is roughly equivalent to a mass email sending, whether it is one-shot or recurrent (Journey Notice, Post-Purchase). It is linked to a specific template used to send it
It is composed by :
- A Name (*)
- A source of content (Salesforce for example) (*) : The source corresponds to the tool in which you created the communication so that you can associate the right content.
- A content (A HTML content) (*) :The content corresponds to the HTML that you are going to send in the case of an email for example.
A content can only be associated to one message, so if in the list the content is grayed out, it means that it has already been associated to another message.
- A campaign : A campaign is a grouping of several messages (communications) in order to have a simplified and aggregated view of the KPIs for this set or to have the possibility to filter more easily several messages to analyse them individually.
For example, it can be :
- a grouping of one or several messages forming a saga
- a grouping of one or several similar messages (Reviews)
A message (communication) can be attached to only one campaign.
At a minimum, it is good practice to associate a message with a campaign of the same name in order to make it easier to find.
- A classification (A HTML content) (*) : Classification allows you to categorise your messages so that you can find them more easily afterwards. You will be able to filter only the messages of such or such classifications and obtain aggregated KPIs at this level.
A sub-classification (A HTML content) Sub- Classification allows you to categorise your messages so that you can find them more easily afterwards. You will be able to filter only the messages of such or such classifications and obtain aggregated KPIs at this level.
A list of sports (Level 1) (*) If your message is specific to certain sports, you can select them. Otherwise you can select ‘multisport’ or ‘no sport’. This will enable you to find all the messages related to these sports more easily and to have aggregated KPIs at this level, but also to allow a calculation of the turnover generated in the sport concerned only rather than at the overall shop level.
A list of sports practiced (Level 2) If your message specifically concerns certain sports, you can select them (having first selected the sports concerned).
This will enable you to find more easily all the messages related to these practices and to have aggregated KPIs at this level, but also to allow a calculation of the turnover generated in the sport concerned only rather than at the global level of the shop.A brand : The brand will make it easier to find several messages from the same brand. To date, only the Decathlon brands are available. In some cases, it is used in the From Name of the email so it is important to choose it carefully in this case. If this is not relevant, you can leave it blank or choose “MULTIBRAND”.
UTMs (Source / Medium / Campaing) (*) : The UTM Campaign is part of the tracking to be put in place on all the links to then be able in Google Analytics or in the datalake to identify the source of the visit and then to attribute the visit, the performance. By feeding it here, all the links in the content will be automatically overwritten with no need for you to do it manually on each link. For a harmonised tracking of your messages in your Analytics tools, we recommend you use the automatic rule but you have the possibility to change it if you wish.
For more explanations: https://en.wikipedia.org/wiki/UTM_parameters
- A list of model Codes present in the email: Here, you are allowed to come and fill in the different model codes of the products you have highlighted in your communication.
This allows you to :
- Analyse the performance of your communication in terms of the purchase of these products specifically.
- Feed the product recommendation algorithms by allowing you to know what was sent to the customer and what his behaviour was towards these products (seen, clicked, bought…) in order to then optimise the recommendations.
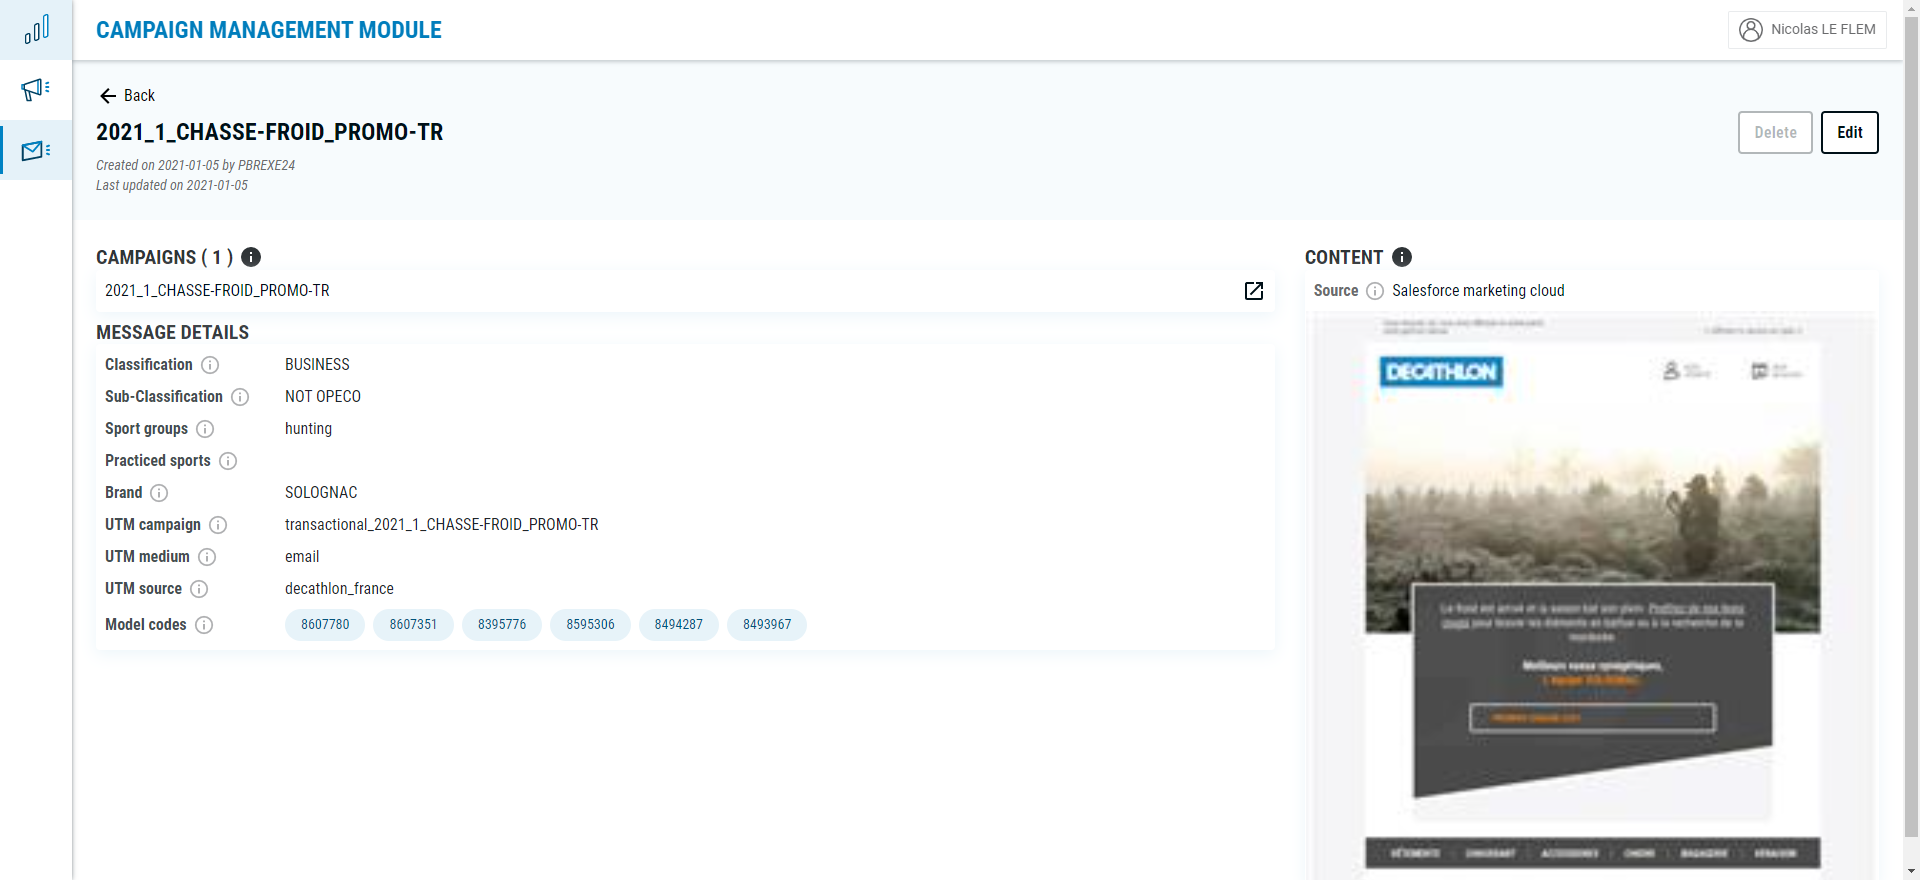
Here is an example :

ACCESS TO THE MESSAGE MANAGEMENT
When you arrive on the Campaign module, you have a menu banner on the left, with different options :
- Campaign : To manage your campaigns
- Message : To manage your messages

You have the possibilty to manage your messages from both, but via the ‘Campaign’ Menu, before access to the message option you have to select the campaign first. It depends what you prefer and how you’re organized.
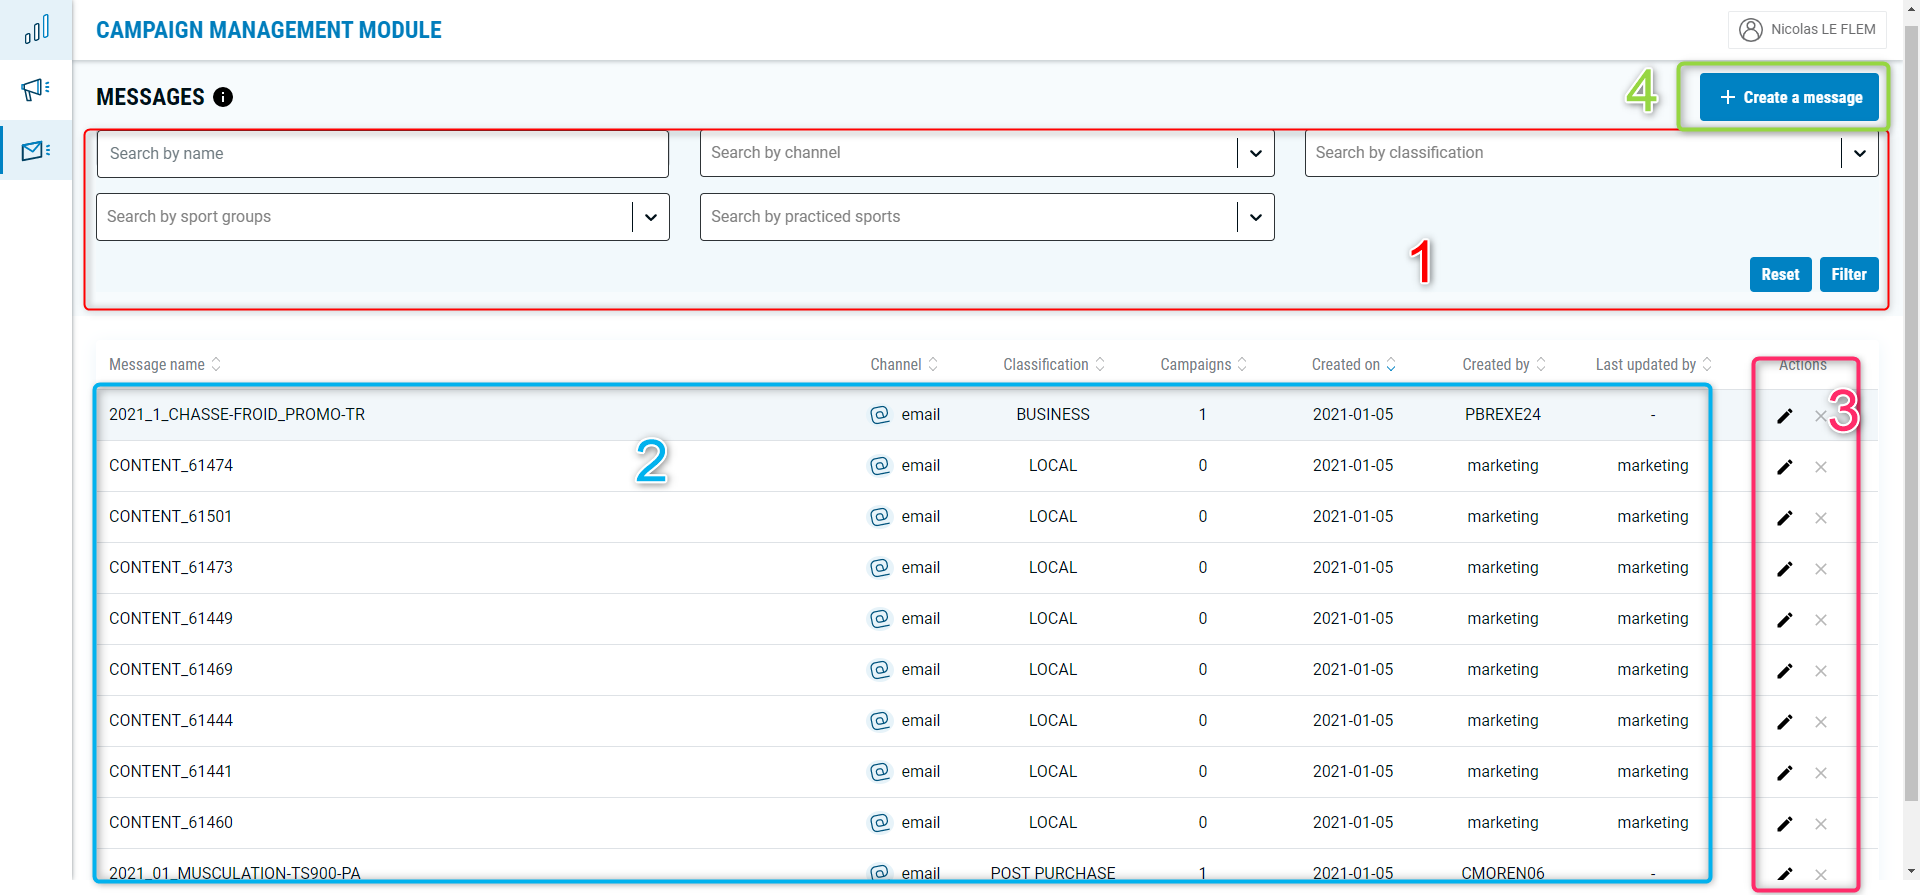
If you come From the Message Menu ,you arrive on the page of Messages management and you have access to different functionalities :
- 1. Search & Find an existing message
- 2. Check the details of an existing message
- 3. Edit or Delete an existing message
- 4. Create a new message

If you come From the Campaign Menu , you arrive on the page of Campaign management and if you selected your campaign, you will have the possibility to manage your message :
- 2. Check the details of an existing message
- 4. Create a new message

1. Search & Find an existing message
You have at your disposal several filters allowing you to search and / or find certain messages more easily
Don’t forget to press the filter button to activate the selection.
2. Check the details of an existing message
On the center of the page you have the different main information about each message, and you have the possibility to click on the line to be redirected to the details page of one message with all the information.
If something seems to have change, you have the details information about the creation date and account and the same for the last modification “Marketing” means it has been done by us through our API.
On the message details page, don’t hesitate to mouse over the ‘i’ to have a details explanation of each part.
On the message details page, you have the possibility to access direclty the associated campaign :

3. Edit or Delete an existing message
You can modify the major part of your message during the lifetime of your message, but pay attention it is not recommended to modify it after the sending, especially long time after, because it’ll be not taken into account on the dashboard for example.
You can delete a message only if only if none has been sent for this message yet, otherwise the option will return you an error.
4. Create a new message
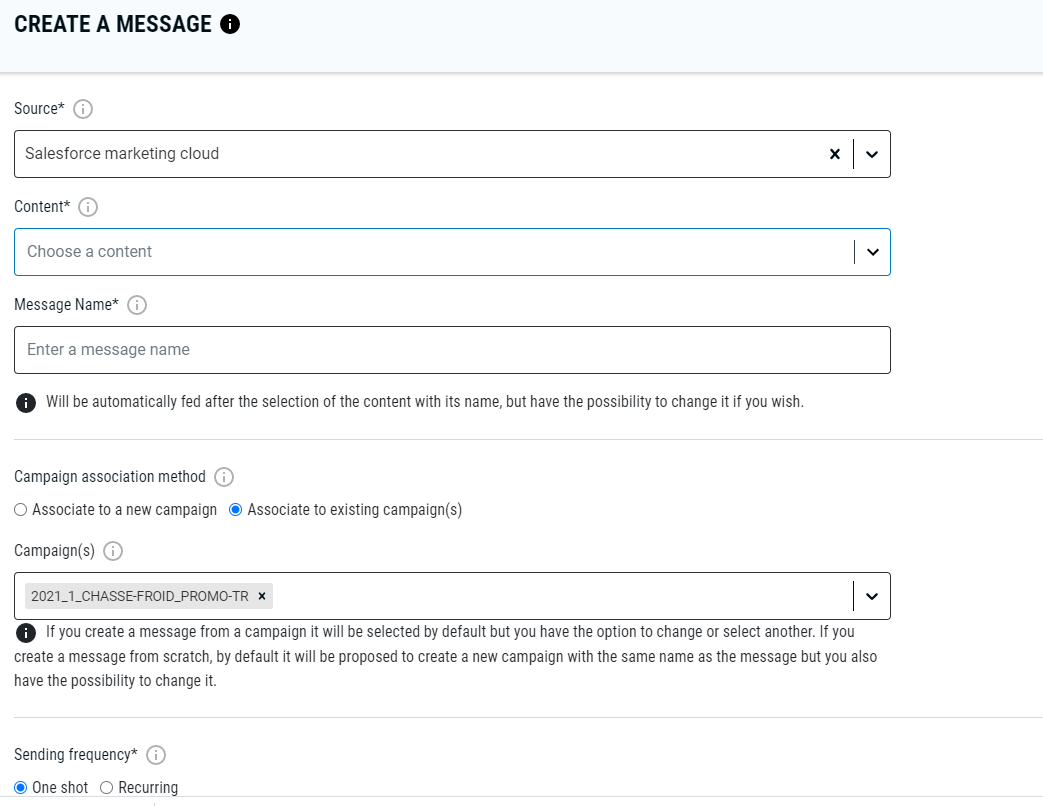
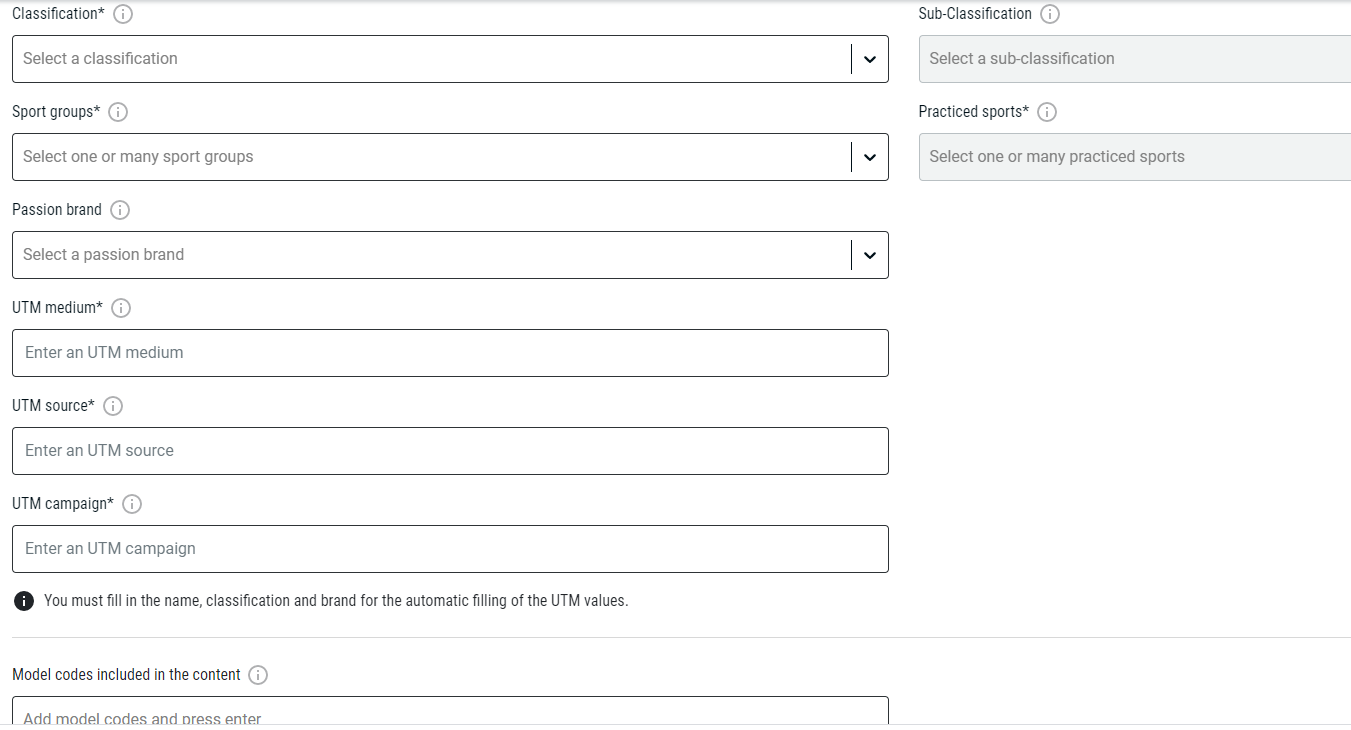
You will arrive on a form where you have to filled the different values. Lots of informations are provided to help you to understand the sense to feed each value and some information to help you tu put the right value, read it carefully the first time.
The form has been created in such a way that if you process it in order you will save time and it makes more sense. Some of the automation will be activated as you enter it.


A content can only be associated to one message, so in the content selection, you can be alerted of that. In that case, verify the message already link, if maybe you or someone of your team already created it otherwise you have to modify the existing message to change its content first.
Thanks to this functionality your UTM management will be applied automaticaly to each links of your email (whether you used the automatic rule or changed it manually). But you do not have to put your UTMS manually on each of your links, in this case it will cancel with the automatic management that we set up, and you will not find any value in Google Analytics. If this was the case, go and check your links in your HTML.
On the form page, don’t hesitate to mouse over the ‘i’ to have a details explanation of each field.
The mandatory information are marked by a (*)
The only difference on this page when you want to create a message coming by a campaign first, the campaign is already associated to earn time, but you always have the possibility to change it